Kafka broker connection on local / AWS
tl;dr
When a client wants to send or receive a message from Apache Kafka®, there are two types of connection that must succeed:
- The initial connection to a broker (the bootstrap). This returns metadata to the client, including a list of all the brokers in the cluster and their connection endpoints.
- The client then connects to one (or more) of the brokers returned in the first step as required. If the broker has not been configured correctly, the connections will fail.
What sometimes happens is that people focus on only step 1 above, and get caught out by step 2. The broker details returned in step 1 are defined by the advertised.listeners setting of the broker(s) and must be resolvable and accessible from the client machine.
To read more about the protocol, see the docs, as well as this previous article that I wrote. If the nuts and bolts of the protocol are the last thing you’re interested in and you just want to write applications with Kafka you should check out Confluent Cloud. It’s a fully managed Apache Kafka service in the cloud, with not an advertised.listeners configuration for you to worry about in sight!
Below, I use a client connecting to Kafka in various permutations of deployment topology. It’s written using Python with librdkafka (confluent_kafka), but the principle applies to clients across all languages. You can find the code on GitHub. It’s very simple and just serves to illustrate the connection process. It’s simplified for clarity, at the expense of good coding and functionality 🙂
An illustrated example of a Kafka client connecting to a Broker
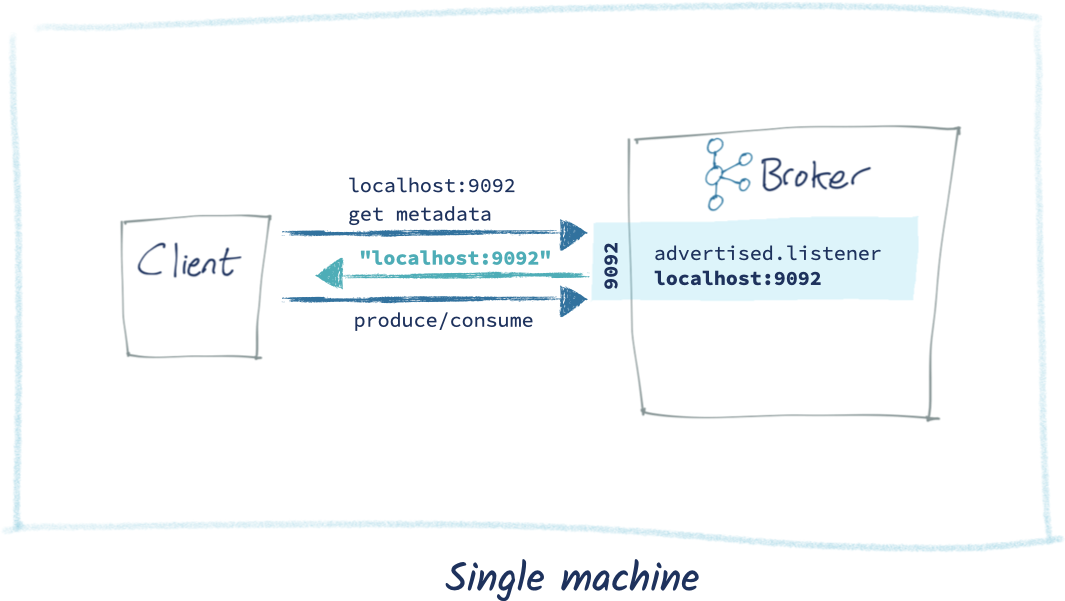
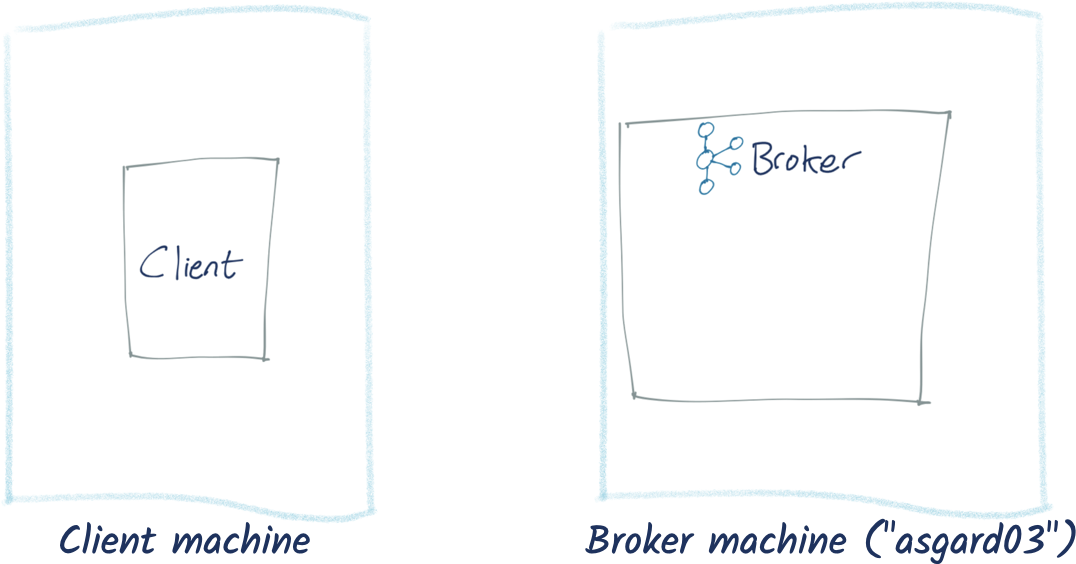
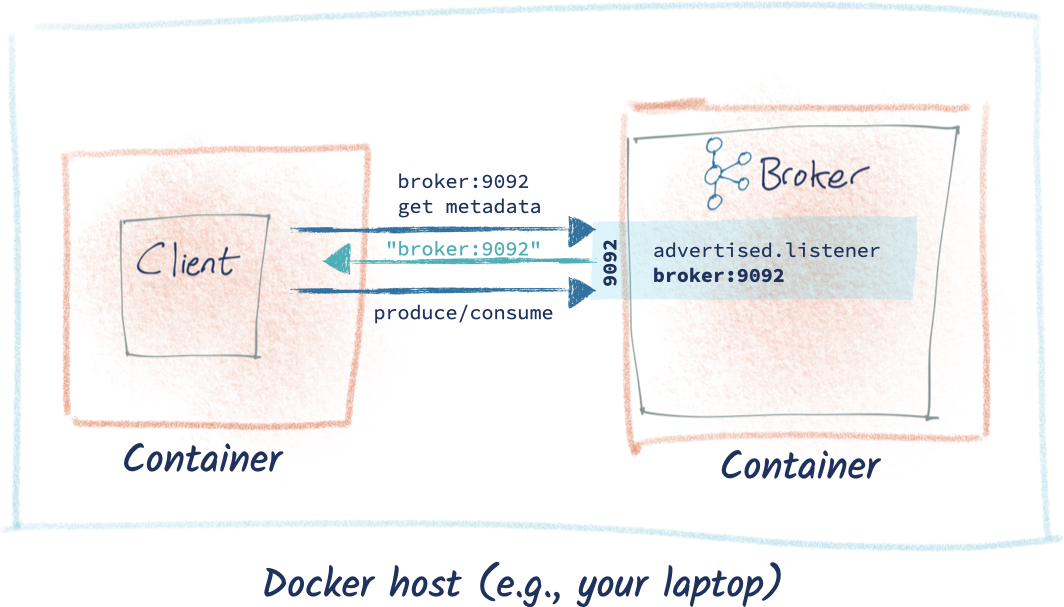
Let’s imagine we have two servers. On one is our client, and on the other is our Kafka cluster’s single broker (forget for a moment that Kafka clusters usually have a minimum of three brokers).
- The client initiates a connection to the bootstrap server(s), which is one (or more) of the brokers on the cluster.
- The broker returns metadata, which includes the host and port on which all the brokers in the cluster can be reached.
- This list is what the client then uses for all subsequent connections to produce or consume data. The address used in the initial connection is simply for the client to find a bootstrap server on the cluster of n brokers, from which the client is then given a current list of all the brokers. This way, the client doesn’t have to know at all times the list of all the brokers. The reason the client needs the details of all the brokers is that it will connect directly to one or more of the brokers based on which has data for the topic partition with which it wants to interact.
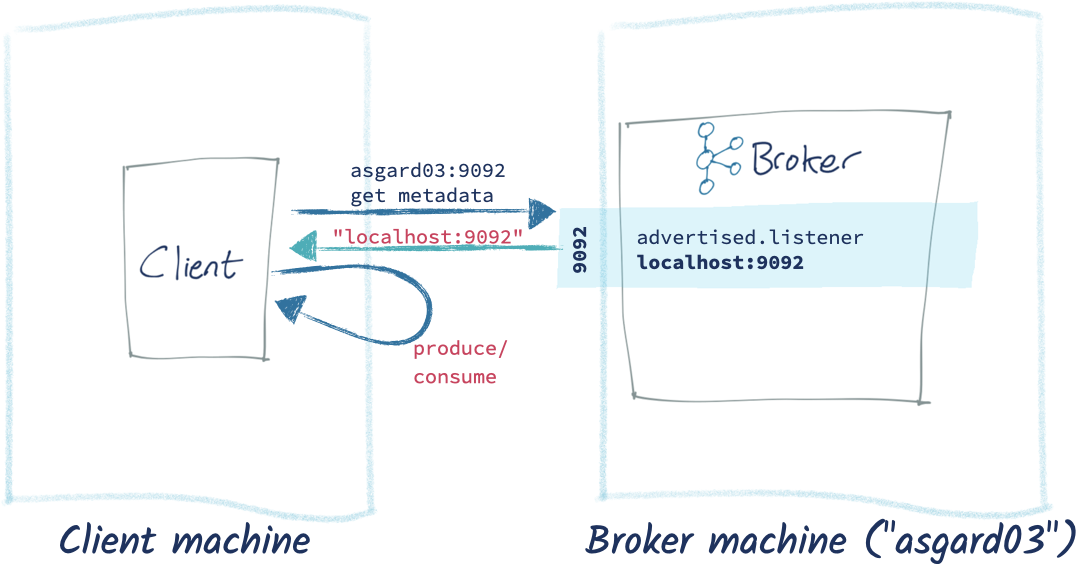
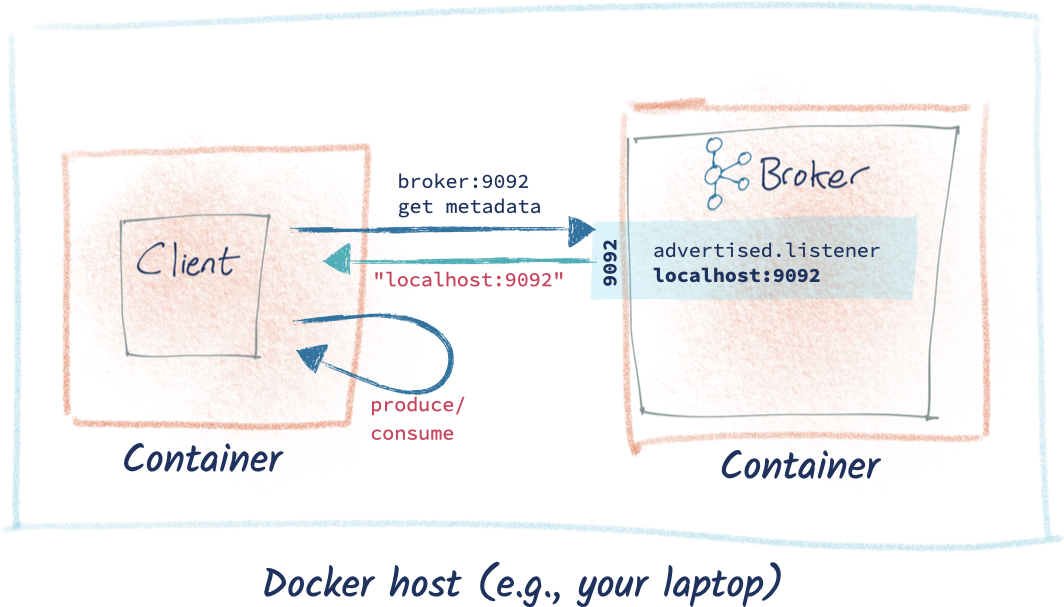
What often goes wrong is that the broker is misconfigured and returns an address (the advertised.listener) on which the client cannot correctly connect to the broker. In this case, the timeline looks like this:
- The client initiates a connection to the bootstrap server(s), which is one (or more) of the brokers on the cluster
- The broker returns an incorrect hostname to the client
- The client then tries to connect to this incorrect address, and then fails (since the Kafka broker is not on the client machine, which is what
localhostpoints to)
This article will walk through some common scenarios and explain how to fix each one.
Just one broker?
All these examples are using just one broker, which is fine for a sandbox but utterly useless for anything approaching a real environment. In practice, you’d have a minimum of three brokers in your cluster. Your client would bootstrap against one (or more) of these, and that broker would return the metadata of each of the brokers in the cluster to the client.
Scenario 0: Client and Kafka running on the same local machine
For this example, I’m running Confluent Platform on my local machine, but you can also run this on any other Kafka distribution you care to.
$ confluent local status kafka
…
kafka is [UP]
zookeeper is [UP]
My Python client is connecting with a bootstrap server setting of localhost:9092.
This works just fine:
Note: The broker metadata returned is 192.168.10.83, but since that’s the IP of my local machine, it works just fine.
Scenario 1: Client and Kafka running on the different machines
Now let’s check the connection to a Kafka broker running on another machine. This could be a machine on your local network, or perhaps running on cloud infrastructure such as Amazon Web Services (AWS), Microsoft Azure, or Google Cloud Platform (GCP).
In this example, my client is running on my laptop, connecting to Kafka running on another machine on my LAN called asgard03:
The initial connection succeeds. But note that the BrokerMetadata we get back shows that there is one broker, with a hostname of localhost. That means that our client is going to be using localhost to try to connect to a broker when producing and consuming messages. That’s bad news, because on our client machine, there is no Kafka broker at localhost (or if there happened to be, some really weird things would probably happen).
And thus it comes to pass:
So how do we fix it? We go and speak to our lovely Kafka administrator (who may well be us) and fix the server.properties on the broker(s) so that advertised.listeners correctly provides the hostname and port on which the broker can be reached from clients. We saw above that it was returning localhost. Let’s go and fix this. In my broker’s server.properties, I take this:
advertised.listeners=PLAINTEXT://localhost:9092
listeners=PLAINTEXT://0.0.0.0:9092
And change the advertised.listeners configuration thus:
advertised.listeners=PLAINTEXT://asgard03.moffatt.me:9092
listeners=PLAINTEXT://0.0.0.0:9092
The listener itself remains unchanged (it binds to all available NICs, on port 9092). The only difference is that this listener will tell a client to reach it on asgard03.moffatt.me instead of localhost.
So after applying these changes to the advertised.listener on each broker and restarting each one of them, the producer and consumer work correctly:
The broker metadata is showing now with a hostname that correctly resolves from the client.
Scenario 2: Kafka and client running in Docker
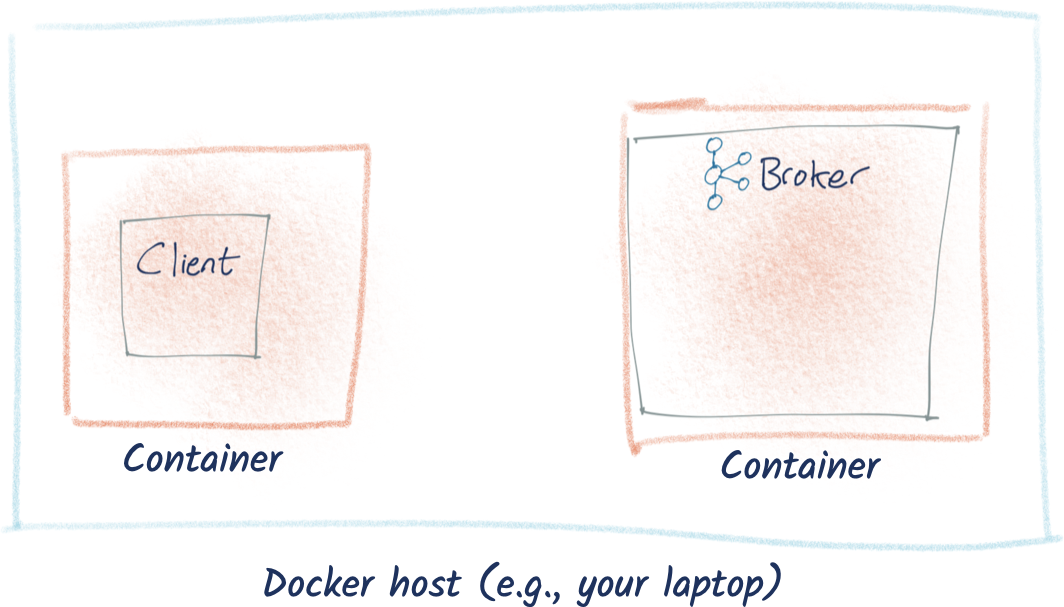
Now we’re going to get into the wonderful world of Docker. Docker networking is a beast in its own right and I am not going to cover it here because Kafka listeners alone are enough to digest in one article. If you remember just one thing, let it be this: when you run something in Docker, it executes in a container in its own little world. It has what appears to itself as its own hostname, its own network address, its own filesystem. So, for example, when you ask code in a Docker container to connect to localhost, it will be connecting to itself and not the host machine on which you are running it. This catches people out, because they’re used to their laptop being localhost, so it seems puzzling why code running on the laptop cannot connect to localhost. But, remember, the code isn’t running on your laptop itself. It’s running in a container on your laptop.
We’ll start with the simplest permutation here, and run both Kafka and our client within Docker on the same Docker network. First, create a Dockerfile to include our Python client into a Docker container:
FROM python:3
# We'll add netcat cos it's a really useful
# network troubleshooting tool
RUN apt-get update
RUN apt-get install -y netcat
# Install the Confluent Kafka python library
RUN pip install confluent_kafka
# Add our script
ADD python_kafka_test_client.py /
ENTRYPOINT [ "python", "/python_kafka_test_client.py"]
Build the Docker image:
docker build -t python_kafka_test_client .
Then provision a Kafka broker:
docker network create rmoff_kafka
docker run --network=rmoff_kafka --rm --detach --name zookeeper -e ZOOKEEPER_CLIENT_PORT=2181 confluentinc/cp-zookeeper:5.5.0
docker run --network=rmoff_kafka --rm --detach --name broker \
           -p 9092:9092 \
           -e KAFKA_BROKER_ID=1 \
           -e KAFKA_ZOOKEEPER_CONNECT=zookeeper:2181 \
           -e KAFKA_ADVERTISED_LISTENERS=PLAINTEXT://localhost:9092 \
           -e KAFKA_OFFSETS_TOPIC_REPLICATION_FACTOR=1 \
           confluentinc/cp-kafka:5.5.0
Confirm that you have two containers running: one Apache ZooKeeper™ and one Kafka broker:
$ docker ps
IMAGE                              STATUS              PORTS                          NAMES
confluentinc/cp-kafka:5.5.0        Up 32 seconds       0.0.0.0:9092->9092/tcp         broker
confluentinc/cp-zookeeper:5.5.0    Up 33 seconds       2181/tcp, 2888/tcp, 3888/tcp   zookeeper
Note that we’re creating our own Docker network on which to run these containers, so that we can communicate between them. Even though they’re running on Docker on my laptop, so far as each container is concerned, they’re on separate machines and communicating across a network.
Let’s spin up the client and see what happens:
$ docker run --network=rmoff_kafka --rm --name python_kafka_test_client \
        --tty python_kafka_test_client broker:9092
You can see in the metadata returned that even though we successfully connect to the broker initially, it gives us localhost back as the broker host. This means that the producer and consumer fail because they’ll be trying to connect to that—and localhost from the client container is itself, not the broker.
To fix it? Tell the broker to advertise its listener correctly. Since the Kafka broker’s name on the network is broker (inherited from its container name), we need to set this as its advertised listener and change:
-e KAFKA_ADVERTISED_LISTENERS=PLAINTEXT://localhost:9092 \
…to:
-e KAFKA_ADVERTISED_LISTENERS=PLAINTEXT://broker:9092 \
So now our broker looks like this:
docker stop broker
docker run --network=rmoff_kafka --rm --detach --name broker \
           -p 9092:9092 \
           -e KAFKA_BROKER_ID=1 \
           -e KAFKA_ZOOKEEPER_CONNECT=zookeeper:2181 \
           -e KAFKA_ADVERTISED_LISTENERS=PLAINTEXT://broker:9092 \
           -e KAFKA_OFFSETS_TOPIC_REPLICATION_FACTOR=1 \
           confluentinc/cp-kafka:5.5.0
And the client works just perfectly:
Scenario 3: Kafka in Docker Compose
Mucking about with command line flags for configuration of Docker containers gets kind of gross after a short amount of time. Much better is to use Docker Compose.
Shut down the Docker containers from above first (docker rm -f broker; docker rm -f zookeeper) and then create docker-compose.yml locally using this example.
Making sure you’re in the same folder as the above docker-compose.yml run:
docker-compose up
You’ll see ZooKeeper and the Kafka broker start and then the Python test client:
Pretty nice, huh 👍
You can find full-blown Docker Compose files for Apache Kafka and Confluent Platform including multiple brokers in this repository.
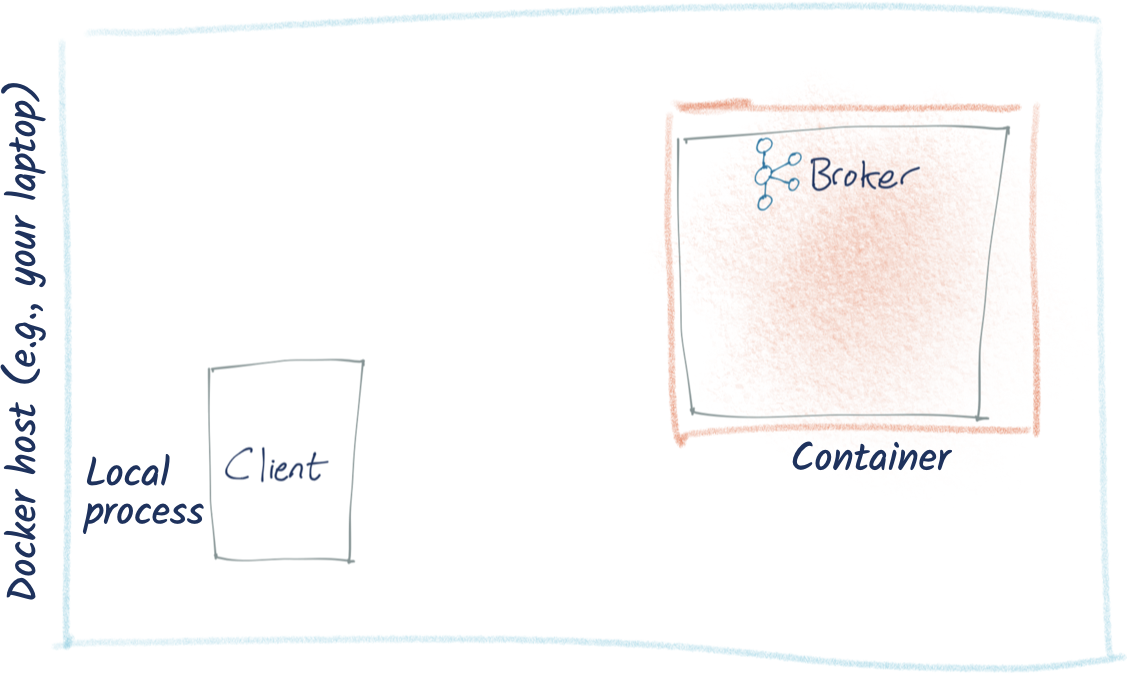
Scenario 4: Kafka in Docker container with a client running locally
What if you want to run your client locally? Perhaps that’s where your IDE resides, or you just don’t want to Docker-ify your client?
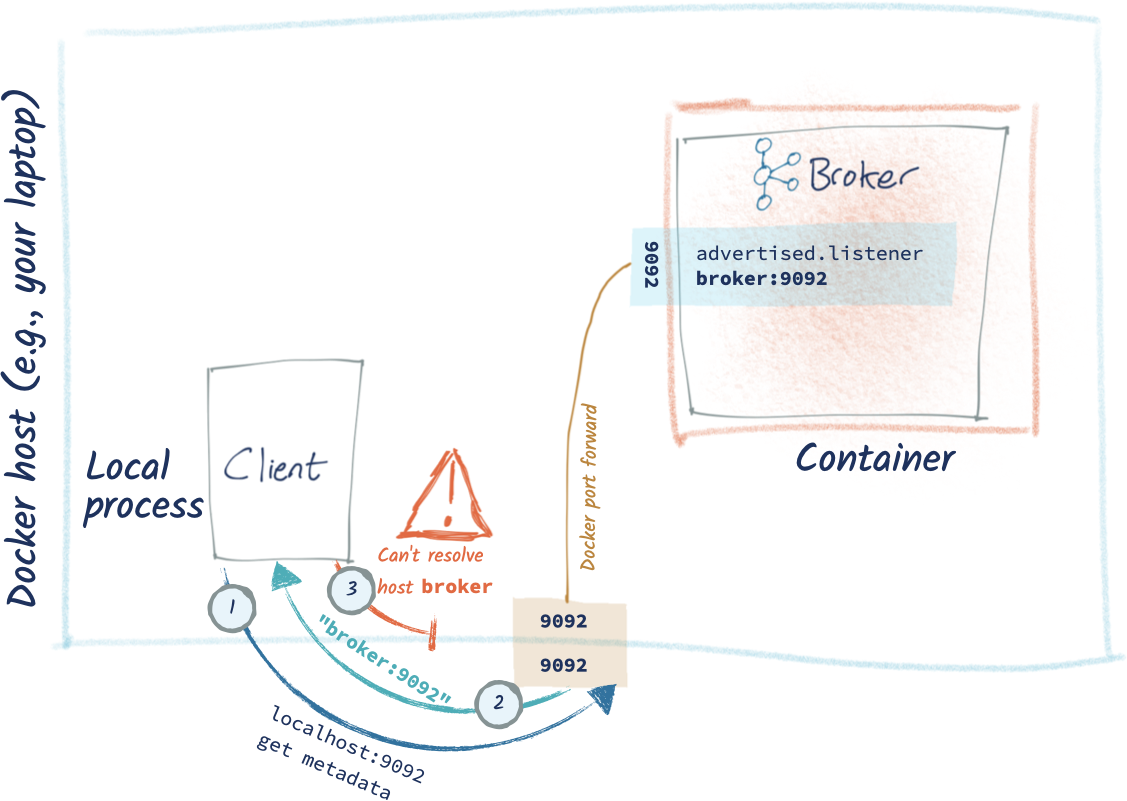
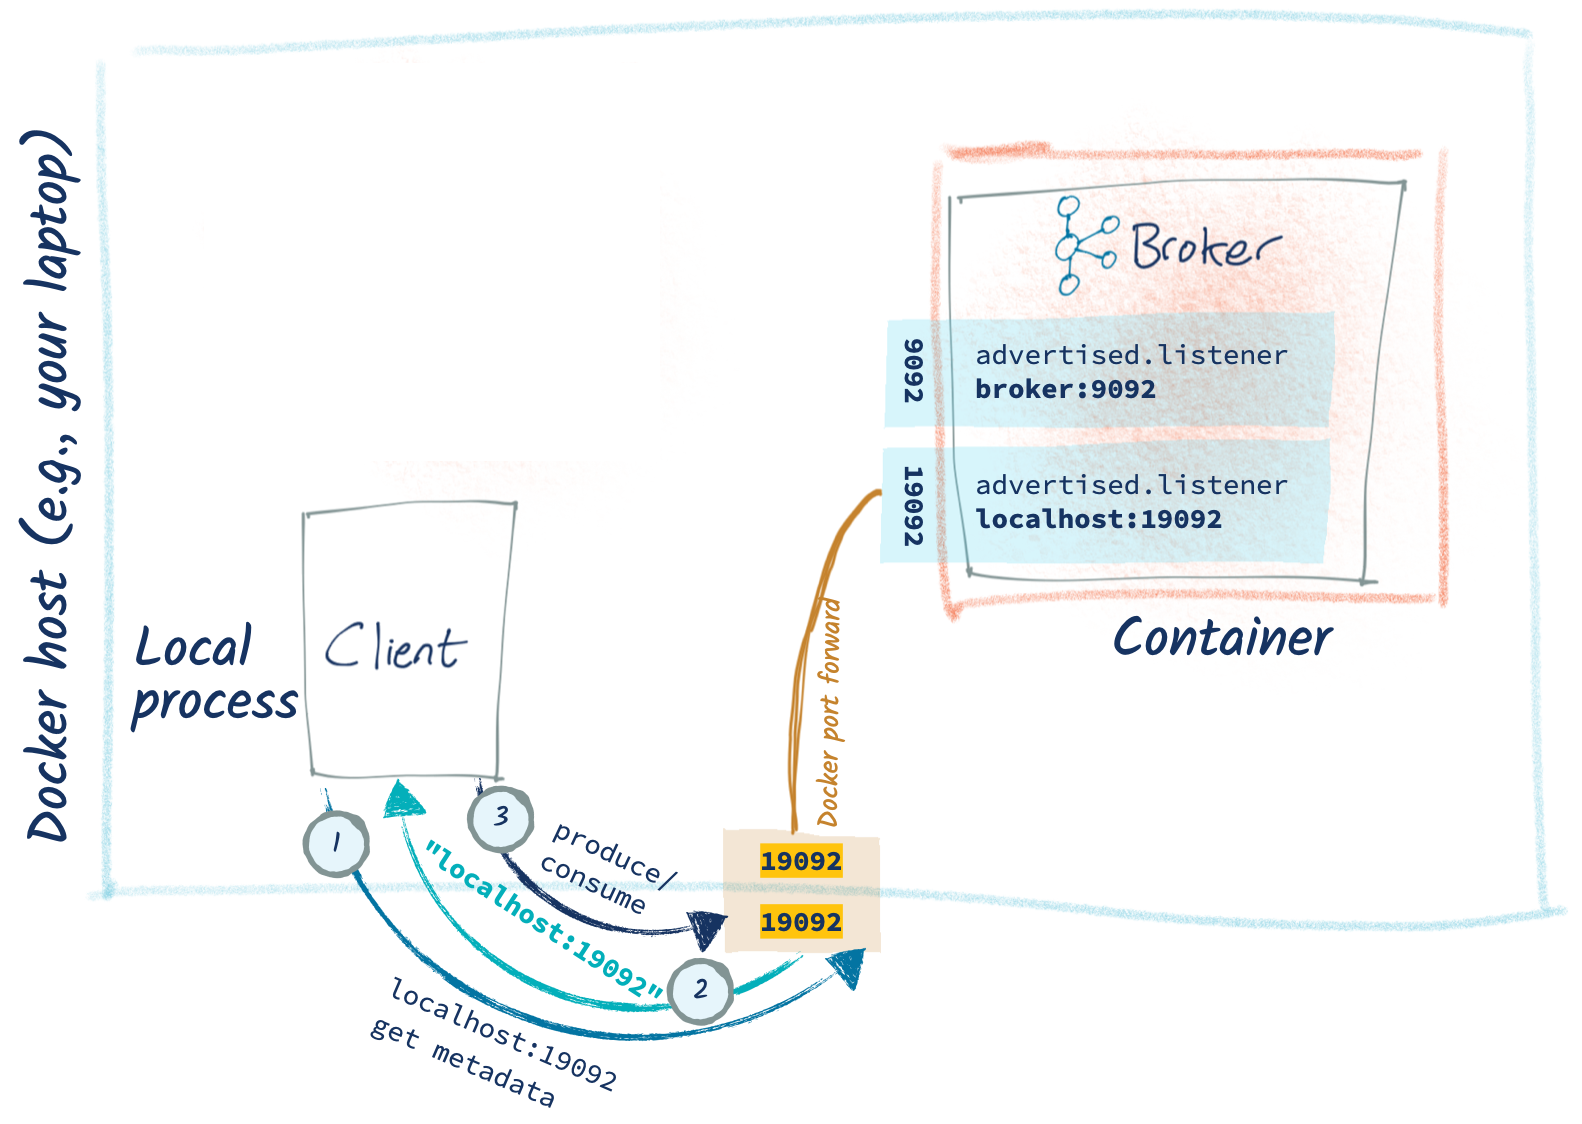
Let’s take the example we finished up with above, in which Kafka is running in Docker via Docker Compose. If we try to connect our client to it locally, it fails:
$ python python_kafka_test_client.py localhost:9092
Ah, but above we were using a private Docker network for the containers, and we’ve not opened up any port for access from the host machine. Let’s change that, and expose 9092 to the host. I’m going to do this in the Docker Compose YAML—if you want to run it from docker run directly, you can, but you’ll need to translate the Docker Compose into CLI directly (which is a faff and not pretty and why you should just use Docker Compose 😉):
…
  broker:
    image: confluentinc/cp-kafka:5.5.0
    container_name: broker
    networks:
      - rmoff_kafka
    ports:
      - "9092:9092"
…
You can run docker-compose up -d and it will restart any containers for which the configuration has changed (i.e., broker). Note that if you just run docker-compose restart broker, it will restart the container using its existing configuration (and not pick up the ports addition).
Once we’ve restarted the container, we can check that port 9092 is being forwarded:
$ docker ps -a
CONTAINER ID        IMAGE                             …  PORTS                          NAMES
37f5df65e9fc        confluentinc/cp-kafka:5.5.0       …  0.0.0.0:9092->9092/tcp         broker
…
Let’s try our local client again. It starts off well—we can connect!
But then things turn sour:
Whilst we can connect to the bootstrap server, it returns broker:9092 in the metadata.
This is exactly what we told it to do in the previous section, when we were fixing it to work with clients running within the Docker network. If we change advertised.listener back to localhost now, the Kafka broker won’t work except for connections from the host.
Adding a new listener to the broker
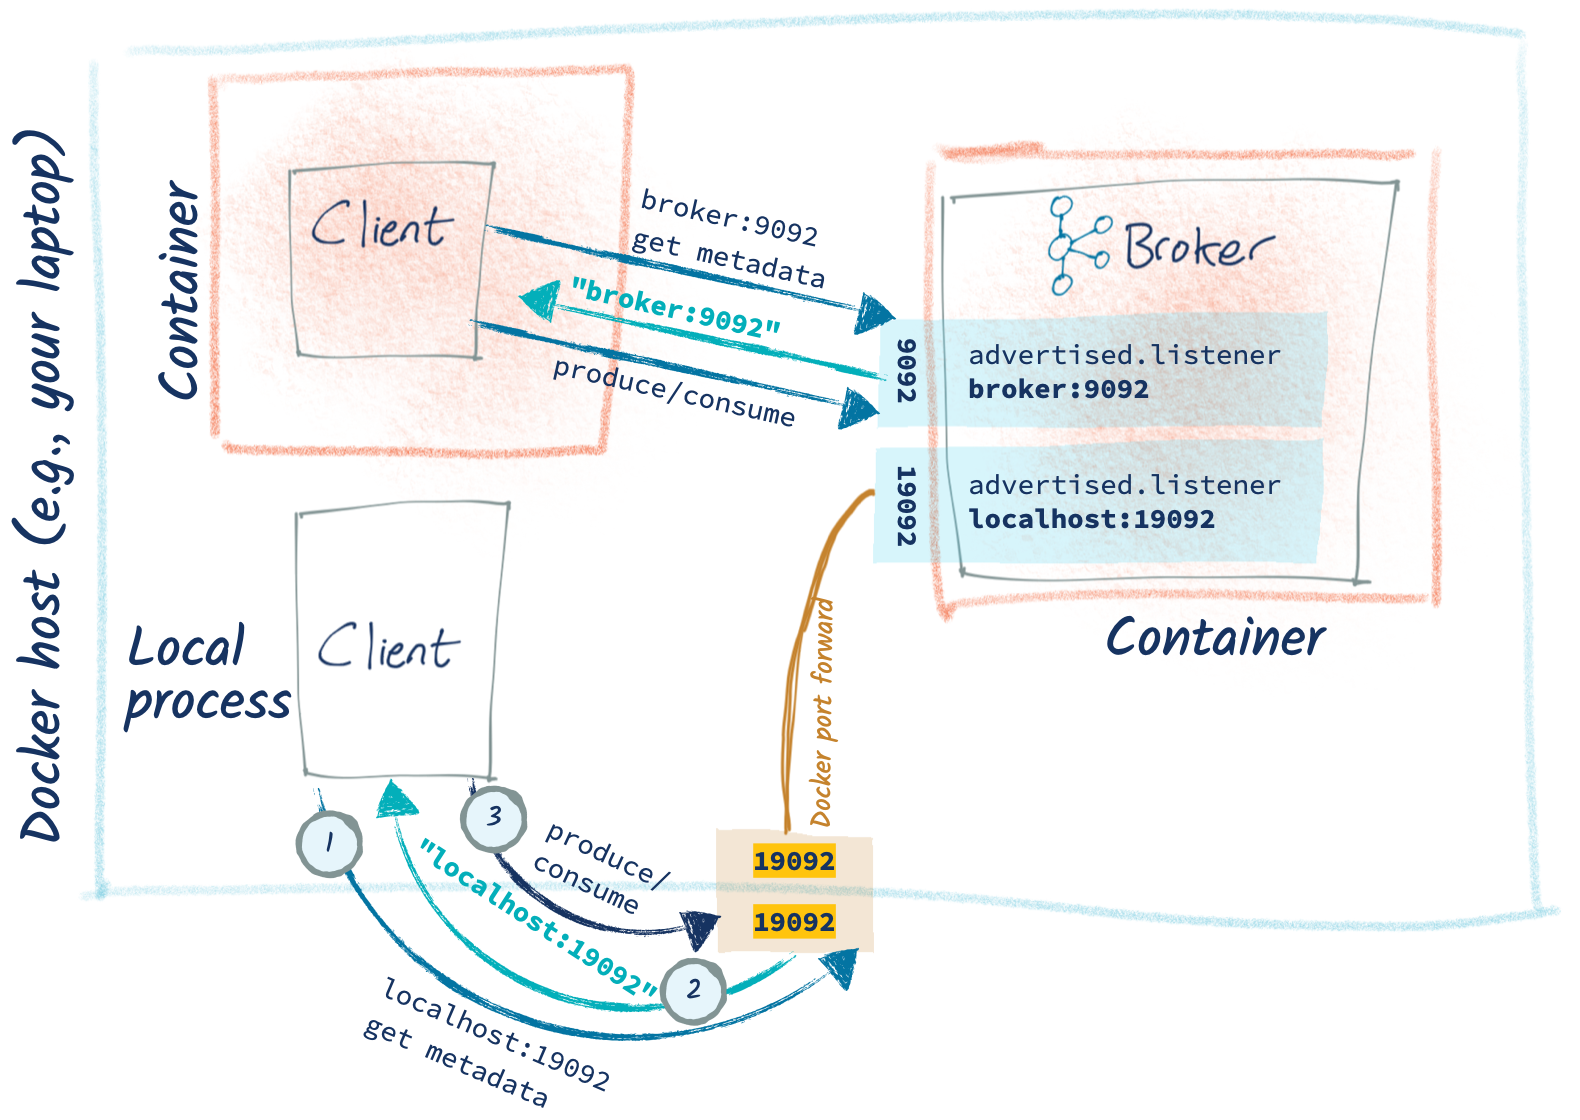
So how do we juggle connections both within and external to Docker? By creating a new listener. Brokers can have multiple listeners for exactly this purpose. Network topologies get funky, and when the going gets funky, Kafka rocks out some more listeners.
The changes look like this:
…
    ports:
      - "19092:19092"
    environment:
      KAFKA_ADVERTISED_LISTENERS: PLAINTEXT://broker:9092,CONNECTIONS_FROM_HOST://localhost:19092
      KAFKA_LISTENER_SECURITY_PROTOCOL_MAP: PLAINTEXT:PLAINTEXT,CONNECTIONS_FROM_HOST:PLAINTEXT
…
We create a new listener called CONNECTIONS_FROM_HOST using port 19092 and the new advertised.listener is on localhost, which is crucial. Because it’s on a different port, we change the ports mapping (exposing 19092 instead of 9092).
The existing listener (PLAINTEXT) remains unchanged. We also need to specify KAFKA_LISTENER_SECURITY_PROTOCOL_MAP. This previously used a default value for the single listener, but now that we’ve added another, we need to configure it explicitly.
After bouncing the broker to pick up the new config, our local client works perfectly—so long as we remember to point it at the new listener port (19092):
Over in Docker Compose, we can see that our Docker-based client still works:
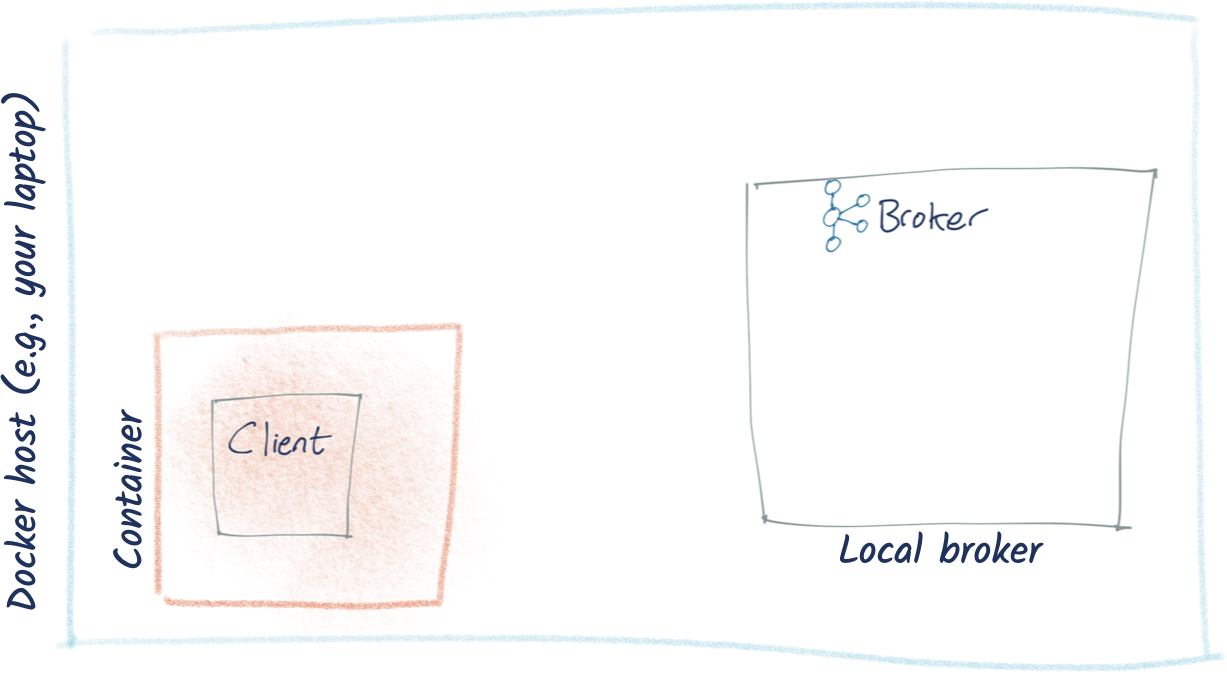
Scenario 5: Kafka running locally with a client in Docker container
What about if we invert this and have Kafka running locally on our laptop just as we did originally, and instead run the client in Docker? It’s not an obvious way to be running things, but ¯\_(ツ)_/¯
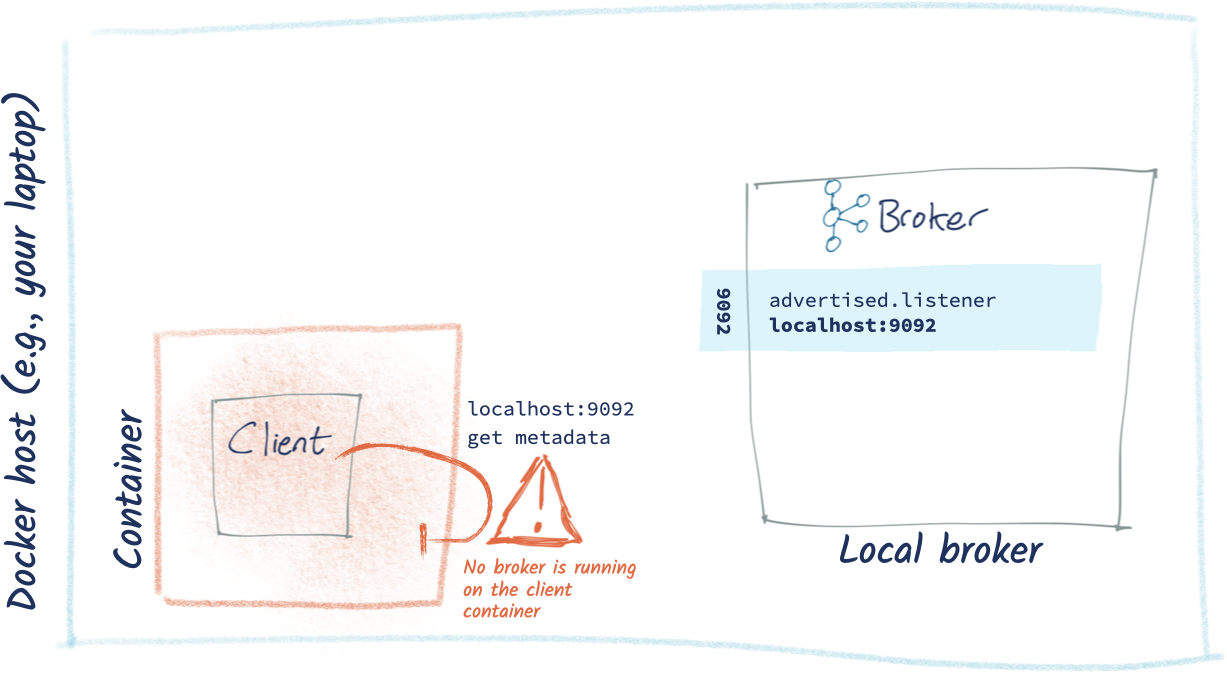
First, I shut down the Docker containers from above (docker-compose down) and then start Kafka running locally (confluent local start kafka). If we run our client in its Docker container (the image for which we built above), we can see it’s not happy:
docker run --tty python_kafka_test_client localhost:9092
If you remember the Docker/localhost paradox described above, you’ll see what’s going on here. Within the client’s Docker container, localhost is itself —it’s not the “localhost” that we think of our laptop, the Docker host, being. And of course, on our client’s Docker container there is no Kafka broker running at 9092, hence the error.
If you don’t quite believe me, try running this, which checks from within the Docker container if port 9092 on localhost is open:
$ docker run -it --rm --entrypoint "/bin/nc" \
    python_kafka_test_client -vz \
    localhost 9092
localhost [127.0.0.1] 9092 (?) : Connection refused
On the Docker host machine, Kafka is up and the port is open:
$ nc -vz localhost 9092
Connection to localhost port 9092 [tcp/XmlIpcRegSvc] succeeded!
So how do we connect our client to our host? Before we answer that, let’s consider why we might want to do this. There are two reasons you’ll be in this state:
- You’re at this point because you’re just developing things and trying to get stuff working in whatever way you can and will worry about doing it “properly” later
- You’re building a client application that will run on Docker and connect to Kafka running elsewhere
For the latter scenario, you need to refer above to the “client and Kafka on different machines” and make sure that (a) the brokers advertise their correct listener details and (b) the container can correctly resolve these host addresses.
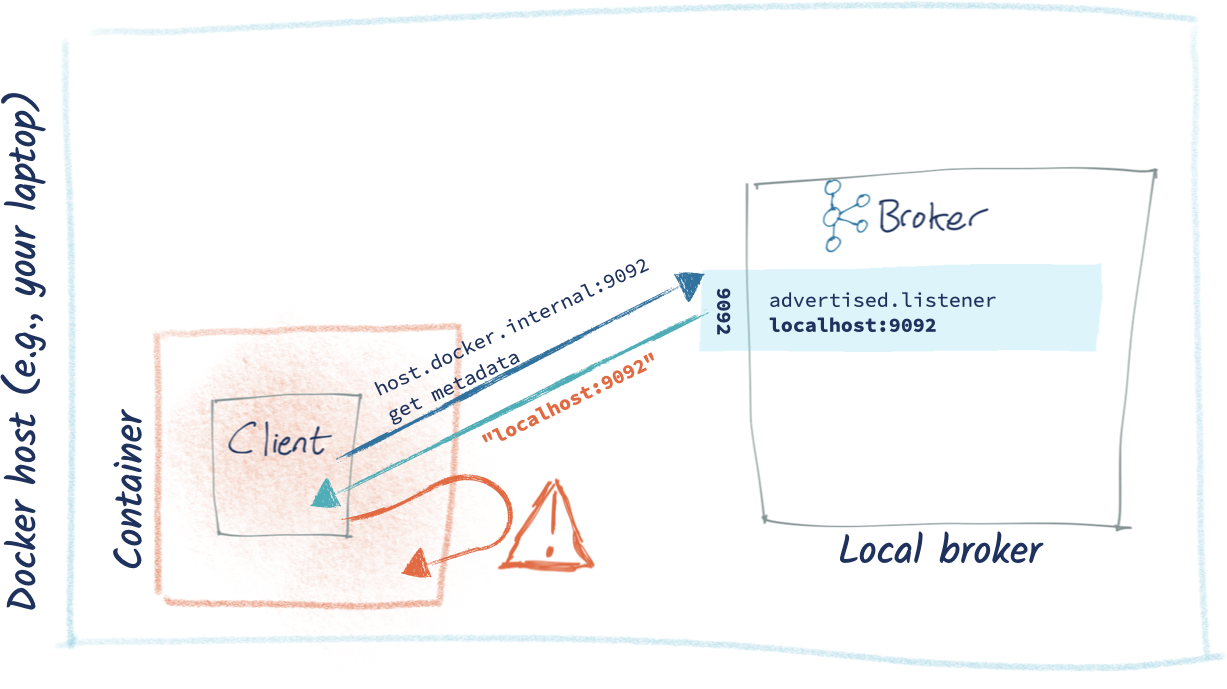
For the former (trying to access Kafka running locally from a client running in Docker), you have a few options, none of which are particularly pleasant. If you’re running Docker on the Mac, there’s a hacky workaround to use host.docker.internal as the address on which the host machine can be accessed from within the container:
$ docker run -it --rm --entrypoint "/bin/nc" \
    python_kafka_test_client -vz \
    host.docker.internal 9092
host.docker.internal [192.168.65.2] 9092 (?) open
So the container can see the host’s 9092 port. What if we try to connect to that from our actual Kafka client?
So the initial connect actually works, but check out the metadata we get back: localhost:9092. Why? Because advertised.listeners. So now the producer and consumer won’t work, because they’re trying to connect to localhost:9092 within the container, which won’t work.
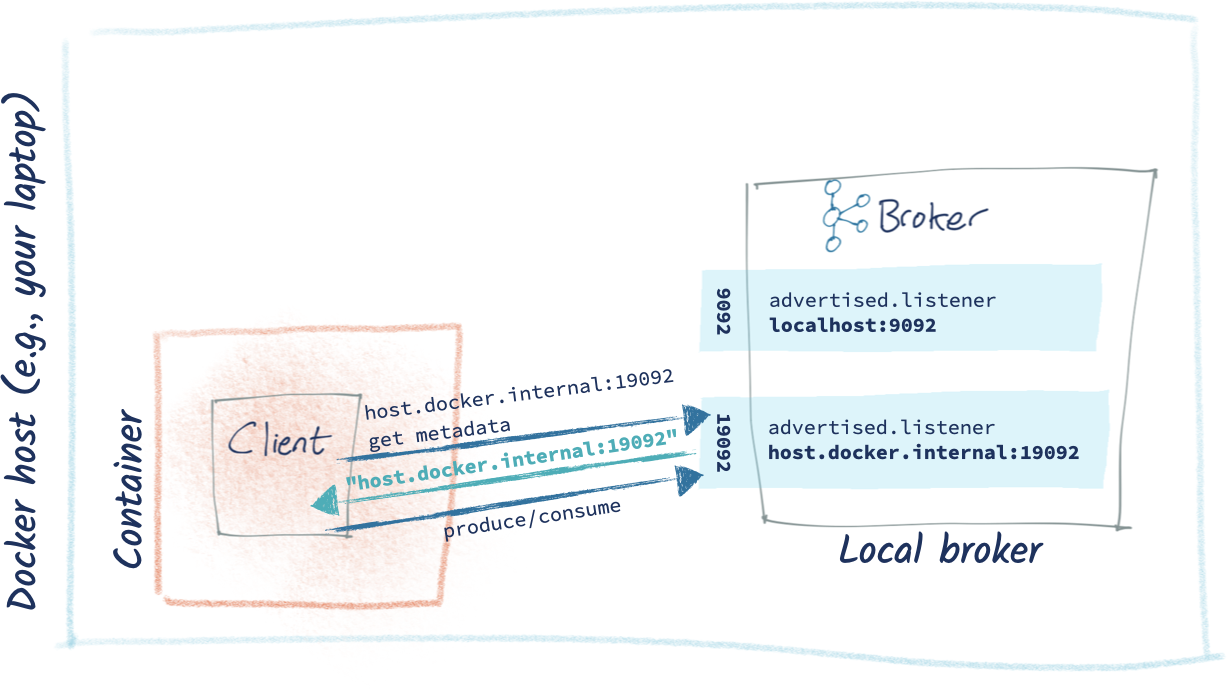
Hack time? OK. Let’s take our poor local Kafka broker and kludge it to expose a listener on host.docker.internal. Because we don’t want to break the Kafka broker for other clients that are actually wanting to connect on localhost, we’ll create ourselves a new listener. Change the server.properties on the broker from:
listeners=PLAINTEXT://:9092
advertised.listeners=PLAINTEXT://localhost:9092
listener.security.protocol.map=PLAINTEXT:PLAINTEXT
…to:
listeners=PLAINTEXT://:9092,RMOFF_DOCKER_HACK://:19092
advertised.listeners=PLAINTEXT://localhost:9092,RMOFF_DOCKER_HACK://host.docker.internal:19092
listener.security.protocol.map=PLAINTEXT:PLAINTEXT,RMOFF_DOCKER_HACK:PLAINTEXT
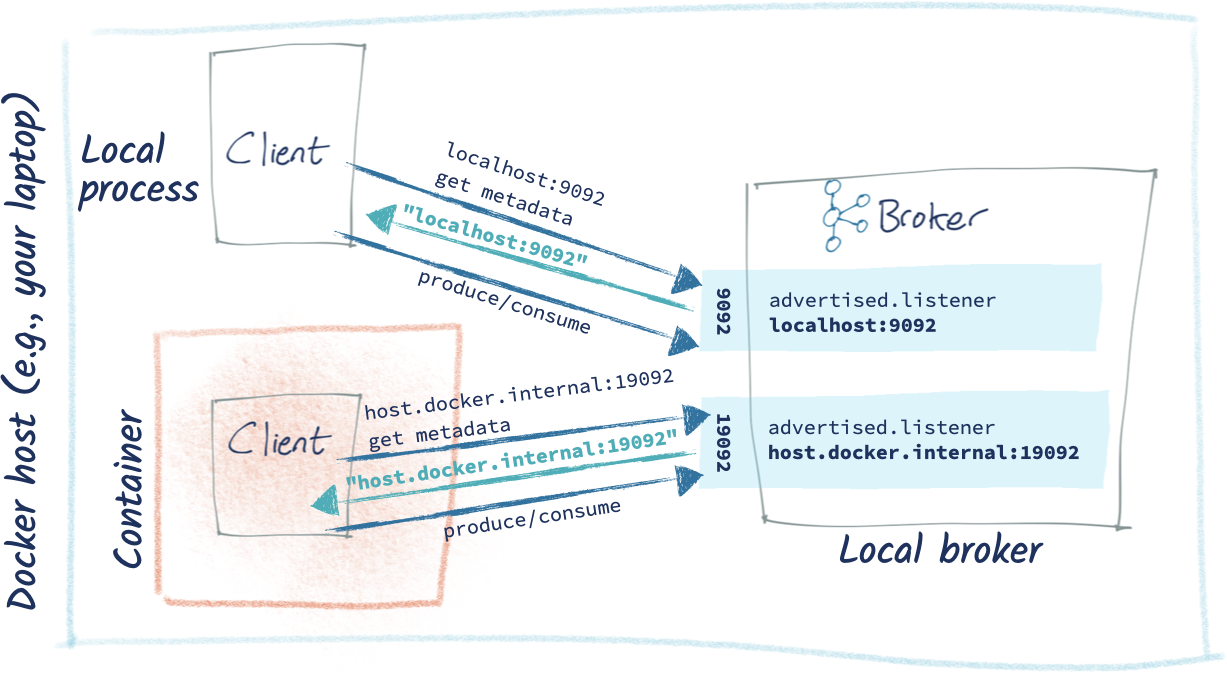
The original listener remains unchanged. The magic thing we’ve done here though is adding a new listener (RMOFF_DOCKER_HACK), which is on a new port. If you connect to the broker on 9092, you’ll get the advertised.listener defined for the listener on that port (localhost). And if you connect to the broker on 19092, you’ll get the alternative host and port: host.docker.internal:19092.
Let’s try it out (make sure you’ve restarted the broker first to pick up these changes):
It works! It’s a DIRTY HACK, but it works 😅. Just as importantly, we haven’t broken Kafka for local (non-Docker) clients as the original 9092 listener still works:
FAQs
Couldn’t I just hack my /etc/hosts file?
- Can you? Yes
- Should you? NO! 🙂
Not unless you want your client to randomly stop working each time you deploy it on a machine that you forget to hack the hosts file for. This is the whole point of hostnames and DNS resolution—they are how machines know how to talk to each other instead of you hardcoding it into each machine individually.
I don’t have advertised.listeners set in my server.properties
By default, it’ll take the same value as the listener itself. You can validate the settings in use by checking the broker log file:
[2020-04-27 21:21:00,939] INFO KafkaConfig values:
        advertised.host.name = null
        advertised.listeners = PLAINTEXT://localhost:9092,RMOFF_DOCKER_HACK://host.docker.internal:19092
        advertised.port = null
…
        listener.security.protocol.map = PLAINTEXT:PLAINTEXT,RMOFF_DOCKER_HACK:PLAINTEXT
        listeners = PLAINTEXT://:9092,RMOFF_DOCKER_HACK://:19092
…
What about advertised.host.name and advertised.port?
They’re deprecated. Don’t use them.
But…I can telnet to the broker just fine, so surely it should just work?
Yes, you need to be able to reach the broker on the host and port you provide in your initial bootstrap connection. As explained above, however, it’s the subsequent connections to the host and port returned in the metadata that must also be accessible from your client machine.
Do I have to use Python to do this?
Nope—any client library (see this list and GitHub) should be able to expose the metadata too. Here’s an example using kafkacat:
$ kafkacat -b asgard05.moffatt.me:9092 -L
Metadata for all topics (from broker 1: asgard05.moffatt.me:9092/1):
3 brokers:
broker 2 at asgard05.moffatt.me:19092
broker 3 at asgard05.moffatt.me:29092
broker 1 at asgard05.moffatt.me:9092 (controller)
You can also use kafkacat from Docker, but then you get into some funky networking implications if you’re trying to troubleshoot something on the local network.
