Setting Up Swagger 2 with Spring Boot
In today’s enterprise software development world, separating the front-end and back-end of a web application is almost a necessity. Consequently, this situation might shape teams or engineers who work on the front and back-end side and eventually require clear and up-to-date API documentation between sides.
Therefore Swagger is an essential open-source toolset that helps you generate beautiful and informative documentation and enables you to design your APIs.
In this tutorial, I will explain “how to set up Swagger 2 on top of a Spring Boot application” in detail.
Check out the complete source code for the “Swagger 2 with Spring Boot” tutorial from the Exceptionly Github account – blog-spring-boot-docker repository.
Adding the Swagger 2 Gradle Dependency
With any third-party library, we will need to add the Swagger dependency to the application. For this tutorial, I will use Springfox implementation of the Swagger specification. Feel free to check out the latest version from mvnrepository.com
implementation 'io.springfox:springfox-boot-starter:3.0.0'
Refresh Gradle dependencies to make sure we fetch the springfox-boot-starter correctly.
Spring Boot Configuration
To enable a Spring Boot application for Swagger, we need to create a Docket bean that will initiate an instance with defaults and the details you specified in the configuration.
@Configuration
@EnableWebMvc
public class SwaggerConfig {

    @Bean
    public Docket api() {
        return new Docket(DocumentationType.SWAGGER_2)
                .select()
                .apis(RequestHandlerSelectors.basePackage("com.exceptionly.tutorials.demo.controller"))
                .apis(RequestHandlerSelectors.any())
                .paths(PathSelectors.any())
                .build();
    }
}
Setting up Swagger in Spring Boot is easy as pie. You actually may spend way more time to verify it by creating an API 🙂
Creating Sample API
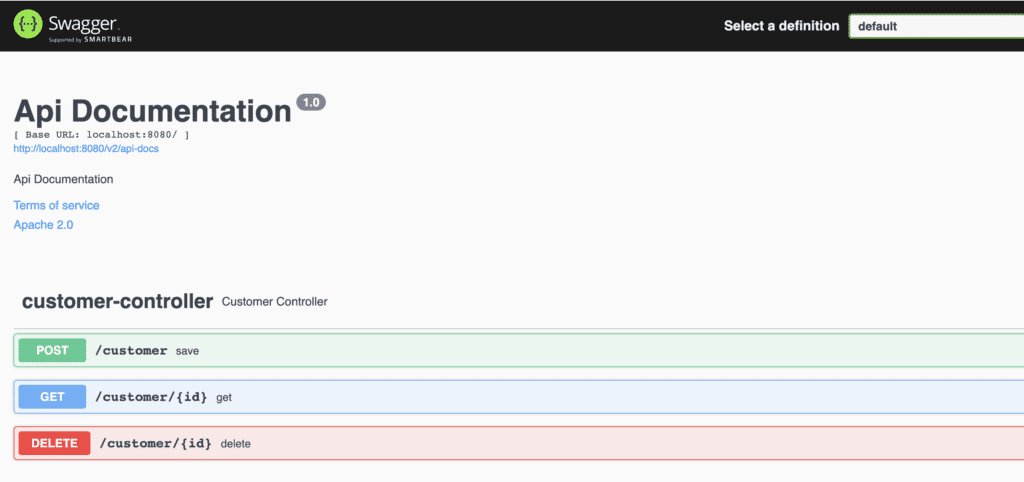
I will create a simple Customer Controller that basically will provide 3 APIs
GET /customer/{id}
DELETE /customer/{id}
POST /customer
@RestController
@RequestMapping("customer")
public class CustomerController {
    private final CustomerService customerService;

    public CustomerController(CustomerService customerService) {
        this.customerService = customerService;
    }

    @GetMapping("/{id}")
    public ResponseEntity<Customer> get(@PathVariable final Long id) {
        return ResponseEntity.ok(customerService.get(id));
    }

    @DeleteMapping("/{id}")
    public ResponseEntity<Customer> delete(@PathVariable final Long id) {
        return ResponseEntity.ok(customerService.delete(id));
    }

    @PostMapping
    public ResponseEntity<Customer> save(@RequestBody final Customer customer) {
        return ResponseEntity.ok(customerService.save(customer));
    }
}
Create an interface for Service with default methods.
public interface CustomerService {
    Customer get(Long id);
    Customer delete(Long id);
    Customer save(Customer customer);
}
And Service implementation;
@Service
public class CustomerServiceImpl implements CustomerService {
    @Override
    public Customer get(Long id) {
        return new Customer(id, "Janis", "Joplin");
    }

    @Override
    public Customer delete(Long id) {
        return new Customer(id, "Chuck", "Norris");
    }

    @Override
    public Customer save(Customer customer) {
        return new Customer(1L, customer.getName(), customer.getSurname());
    }
}
Run the application from Spring Boot application starter or by the following command;
./gradlew bootRun
Once the application is started, navigate to the URL http://localhost:8080/swagger-ui/index.html to check out the Swagger UI.
Credits :https://exceptionly.com/2022/02/09/swagger-2-with-spring-boot/